Gavin Grimmer


put up a pretty convincing case... Photographs he had obtained from presumably the RNZAF Museum in Christchurch . Photographs taken during WW2 showing evidences of many of these tunnels being built, and small clips of some of them I have already shown in these articles. All John had to do was prove there was one missing hidden tunnel and he would have shed enough light to win his case.
Sadly, John did not have the technology nor the equipment to do this, so he never knew what he had until a couple of years ago when we got access to these photos and showed him what can be done with the help of computers. Sadly John will never get to see the day when access to these hidden tunnels is granted, and the problem with these explosives can then be dealt with. Martin informs me that the technology is now available to neutralise these explosives. He just needs the permission to dig!
The problem won’t go away, so it is like so many of life’s problems, eventually you have to face them... Anyway, back to the subject, and while I think of it.... why was I so interested in the thickness of the roof on the northern magazine/plotting room? To remove all the material on top of it and then remove the huge very heavy gun that was still lying in the pit in 1939 would take some fairly heavy equipment. Equipment that simply could have collapsed the roof if the roof was not strong enough!
In the Motutapu Island article on the web:
The Shell Hoist
At the end of each magazine closest to the emplacement and leading up to it at an angle was a hand operated hoist. This supplied both shell and cartridge to the working area
It was in the form of a rectangular metal shaft containing a rotating dredger-like hoist within.
At each end of the hoist aperture was a series of doors controlled by interlocks to prevent the flash from an explosion passing down to the magazine. If one of the doors was opened, the other would automatically shut.The hoist was hand powered
There is also a vertical shaft ventilation/escape route with an 8 metre steel fitted ladder leading to outside.
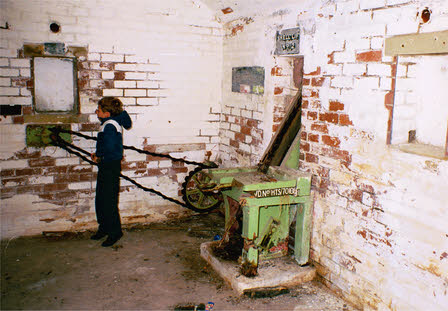
 This was the best photo I could find on the web that shows what is most likely a
similar Shell Hoist that was likely to have been used in this northern gun battery.
It was hand powered as per the Motutapu examples and that was by a crank handle onto
the chain sprocket by where this boy stands. It is a bit hard to see, but I think
he is actually holding on to the handle? You’ll note the article also talks of a
vertical escape shaft and these were quite often mentioned in the affidavits (although
not recognising them as escape routes)

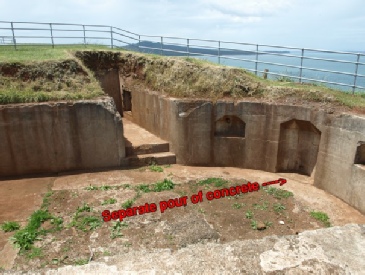
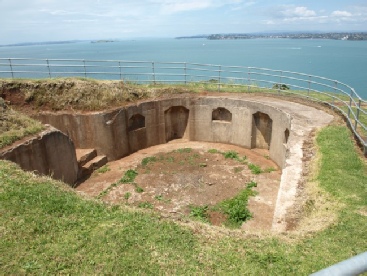
These two photos above are two photos I took of the old Southern Summit 7” Gun pit. You’ll note that it is very similar to the northern gun pit parapet, in fact, apart from the side entrances, it would most likely be identical. Note that where the ammunition hoists should be, there is a floor poured in both of them that is completely separate from all the surrounding pours. This to me is indicative of them being filled in at a later point. The entrance off to the side shown with the stairs leading into it, has a solid wall at the end of it, and although this is drawn in Mitchell’s Plan Illustration and it looks original doesn’t mean to say that it is, but then again it may be? It’s just I have learnt through all this is that you just can’t take anything for granted. This short alleyway, I believe was used for reloading the gun, so the wall may well be genuine. Probably the reason this gun pit doesn’t have an alleyway on the southern side opposing this one is presumably because any enemy ship should not have been able to get that far into the harbour for the gun to need being loaded in that direction. The harbour entrance was mined anyway, so if one did break through all their defences, the mines would have sunk it. Judging by what was there for the old northern gun pit, I would say that a similar underground system would be under this one.
NH Page 41
